Hosting Our Holy Handbook: A Journey in Serverless Simplicity
How we built a simple, secure, and serverless internal website on Google Cloud

Tom Uijtdehaag
Here at BigData Republic, we're a small group of data experts. In a small company with distributed ownership and responsibility of processes, they can easily go undocumented or be lost. In order to document processes and make them easily accessible we identified a need for what I have now dubbed our Holy Handbook. In this blog post we're going to look at our requirements and considerations, and the architecture this has led to. So, if you're curious about hosting your own private static website, keep reading!

Requirements
The handbook has a couple of simple requirements.
Easy access
Colleagues, and only colleagues, need to be able to access the handbook easily from anywhere, in a location that is easy to remember. Preferably without requiring yet another account. It would also be nice if it’s not some massive document that lives on Google Drive and gets buried and forgotten over time.
Easy edits
Because the processes in the handbook have multiple owners, and we encourage anyone to update or expand any incorrect or missing information, we need it to be editable by anyone in the company. Furthermore, editing should be an easy 5-minute job, also for our marketeers, HR and office- and sales managers.
Low cost
We’re a small company, so this handbook will not get a lot of traffic. Let’s make sure there isn’t a dedicated server running for our whopping ~20 requests/week.
Constraints
We’re already using the Google Workspace suite for our productivity and collaboration. Additionally, we use Google Cloud Platform for internal projects. We’re limiting our scope to those for authentication and hosting respectively.
Considerations
So given those requirements and constraints, let’s take inventory of what’s needed to host this static handbook.
- Static content (collection of text and media)
- Serving (web server)
- Hosting (compute)
- Networking (internet access)
- Authentication (limited access)
Static content
Given the requirement for easy editing, there’s one very obvious option here: Markdown. It’s widely known and used for technical documentation and note taking, has a very simple syntax and can easily be rendered as HTML using something like Hugo. This also allows us to automate the whole publishing process away from the writer, so they only need to be able to create or edit some plain text files containing Markdown.
Serving
Now that we have our content as HTML, we need to serve it to the reader. For that we need some kind of web server that responds with our static HTML when the reader requests it. There are some very simple solutions to solve this problem, e.g. the well-known reverse proxy Nginx has web serving capabilities. In our case, we’re looking for something even lighter-weight, because why not? There are many such web servers but a quick Google search lands us at a super small Docker image (~80KB) by Florin Lipan based on BusyBox. Conveniently this is a ready-to-use Docker image that requires very little configuration to do what we need it to do.
Hosting
Ok, so we’re able to serve static HTML, but something needs to run that Docker container. This is where serverless compute comes in (Google Cloud Run in our case). Which is ideal to minimise costs for this type of low-traffic application, because it also allows us to scale down to 0 instances in case of low traffic. Which, let’s be honest, will be most of the time in our case.
One interesting consideration here is how we host our static files. There are basically two options:
- Pack them into the Docker image
- Host them in a Cloud Storage Bucket
The former is slightly simpler to set up but it requires us to re-build and re-publish the Docker image on every content change. The latter requires an additional resource in our architecture. We chose to host the static file separately and mount this bucket as a volume in Cloud Run, because it’s cleaner and prevents our Artifact Registry from holding a million revisions of the same Docker image in a few years.
Networking
We want our site to be accessible from anywhere. GCP requires us to use an External Application Load Balancer in order to direct network traffic coming from the internet to serverless compute. This load balancer directs traffic that’s looking for our web server to the right server that happens to be running our container at that point in time.
A load balancer in GCP can have a number of different configurations but in our case consists of the following components:
- Forwarding Rule — This is where traffic from the internet comes in, in our case some static ip. It points to the Target Proxy.
- Target HTTP/S Proxy — This is the middle man that handles connections to clients, and makes connections to the backends.
- URL Map — This is like a reverse proxy.
- Backend Service — This defines how traffic is distributed.
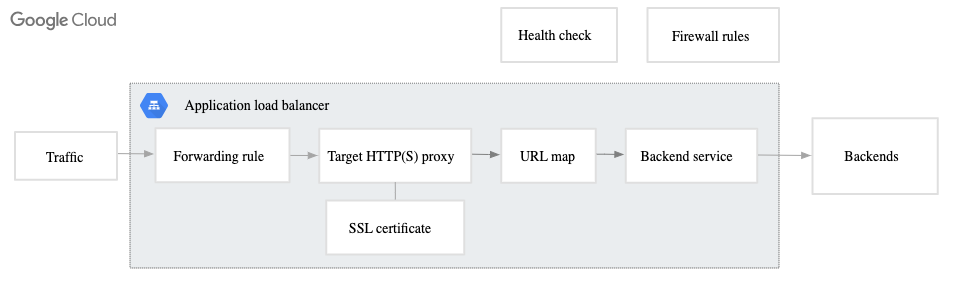
Load balancer components as described by Google Cloud
Authentication
Now our handbook is accessible from anywhere, but also by anyone. This is problematic, so let’s limit access to only people with a Google Workspace account ending in @bigdatarepublic.nl. This is where Google’s Identity Aware Proxy comes in, which allows us to let readers authenticate using their Google Workspace account.
This involves a few steps:
- Create an OAuth Brand, where you set the authorized domain to your desired audience (in our case bigdatarepublic.nl)
- Create an OAuth Client with an Authorized redirect URI set to
https://iap.googleapis.com/v1/oauth/clientIds/CLIENT_ID:handleRedirectwhereCLIENT_IDis your OAuth Client ID. - Enable IAP on your Load Balancer.
Architecture
This leaves us with the following architecture overview.
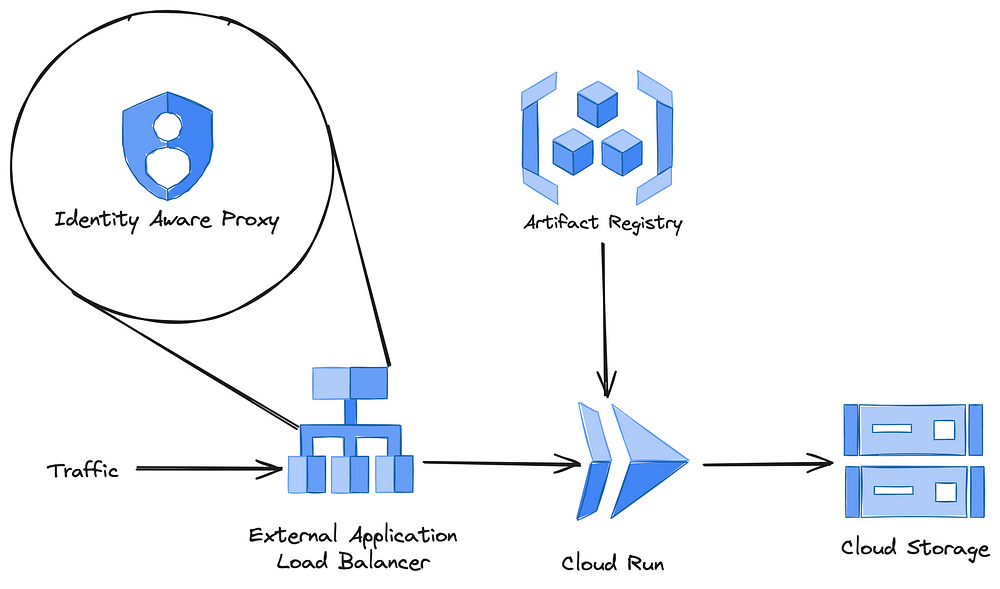
GCP Architecture overview
Automation
Cool, our handbook is live. There are two problems left to fix:
- We clicked together a bunch of resources in GCP. This will bite the next maintainer of our handbook (or even worse, future me) in the ass because they don’t know what we did and for which reasons. Yes, you can try to document everything, but we all know how easy it is to forget one insignificant setting, leading to a day of wasted time debugging something in the future. This is where Infrastructure as Code (IaC) shines: Terraform to the rescue! There are cloud specific options for IaC, but Terraform is cloud agnostic and widely considered industry standard.
- In the current state every update to the content of our handbook requires a) a detailed manual, and b) more manual work than necessary. Let’s fix this using CI/CD.
Infrastructure as Code using Terraform
By using IaC, our infrastructure and changes to our infrastructure, are documented automatically through version control. This is great because it allows us to reproduce or revert to a previous version of the same infrastructure for whatever reason necessary.
Some caveats to account for when migrating to Terraform:
- Not all resources are fully supported by the GCP API, and therefore Terraform. In this case the IAP. For that reason I chose to add this through the console.
- Some resources, like the Load Balancer we saw earlier, are easy to configure through a wizard in the GCP console but require quite some manual setup in Terraform. Just the Load Balancer in our application ended up consisting of 10 resources. To be clear: This is not a big deal once you’ve set it up once but it can be a bit of a puzzle.
- When Terraform runs, it needs to impersonate someone or some Service Account. In case you’re running Terraform locally, it will impersonate you since you’re authenticated with the gcloud CLI. However, when Terraform runs from a CI/CD pipeline (see next section), it requires you to set up at least one service account with the appropriate roles manually for Terraform to impersonate.
Automatic deployments using CI/CD
This is where the grunt of the automation takes place, really enabling content updates as simple as pushing some markdown to a branch. Roughly, our CI/CD pipeline consists of these steps:

Overview of the CI/CD pipeline
- Checkout the git repository — Every story starts somewhere.
- Authenticate & Setup Google Cloud — We used keyless authentication through Workload Identity Federation, which is nice because it eliminates the need for any long-lived keys that would otherwise be stored in your CI/CD runner. It does require you to set up a Workload Identity Pool and a provider.
- Run Terraform — Terraform checks the current state of your infrastructure and makes any changes if necessary. In our case, because there is this chain of dependencies: Cloud Run → Docker Image → Artifact Registry, we included the Docker build and publish step as a
null_resourcein Terraform. This avoids splitting up the terraform configuration. Note: We runterraform apply -auto-approveon merge for simplicity. A nice improvement would be to additionally comment the output ofterraform planon your PR upon creation or an update. - Render & Publish HTML with Hugo — Hugo renders our Markdown files to HTML, and has built-in functionality to deploy to Cloud Storage.
Conclusion
So we have satisfied our requirements and stayed within our constraints. This solution runs for about €0,60 / day, of which approximately 90% is networking (the load balancer), so let’s say that the cost requirement is also satisfied.
Lessons Learned
Because this was an existing project, I dove straight into Terraform. This taught me a few lessons:
- Although it’s still marked as experimental, Terraform has pretty decent code generation for existing resources. Though it will likely never be perfect because it relies on providers, using import blocks and resource ids you can get a good base to get started with.
- Now, this is probably a rare use-case. But, if your laptop happens to get stolen in the middle of a Terraform project (like mine did), or you need to recover your work for any less dramatic reason; Here are my 7 easy steps towards (mental) recovery:
- Go through the 5 stages of grief
- Configure your existing backend
- Run the following command to generate import statements:
 terraform show -json \
| jq --raw-output '.values.root_module.resources[] | "import {\n  id = \"\(.values.id)\"\n  to = \(.address)\n}\n"' \
> imports.tf
- Remove the remote backend from your config
5. Runterraform plan -generate-config-out="generated_resources.tf"
6. Copy and paste the generated resources into your configuration
7. Re-configure your remote backend
Note: This requires you to have your state somewhere on a remote backend.
- It would have made more sense to do this project in reverse. Instead of starting with Terraform straight away, I should have started in GCP console first. I was baffled by the complexity required to host a simple static website on GCP. Coming from hosting something like this on a single VPS with a web server and a reverse proxy. Turns out most of that complexity stems from the load balancer. It would probably have made more sense if I had seen the console version first, but hey, who doesn’t like a challenge?
Final Thoughts
The only thing that has left me wondering as I stumbled across this Bucket as a static site: Can we cut out the web server completely, and just serve our static files directly from a Cloud Storage Bucket? This would decrease complexity even further by eliminating Cloud Run, Artifact Registry and our Docker build step in Terraform. Whether this is possible remains to be discovered, this issue tracker that turns 7 this year would suggest it’s not but there seem to be some workarounds in the discussion.
To be continued…